Lecture 19 - Fractals
As usual, create a directory to hold today's activities:
$ mkdir ~/cs170/labs/lab19
$ cd ~/cs170/labs/lab19
A Primer on
You all need to know complex numbers for this week's assignment. So, let's talk about what a complex number is, and the operations you need for complex numbers.
Reading Quiz on Wednesday
Since the at home reading quiz was not well recieved, we will have an in class quiz on wednesday pertaining to the reading on Linked Lists for Wednesday. Don't forget about this one!
Welcome back everyone! Today in lab we are going to knock a little bit of rust off by doing fractals. Fractals are structures that exhibit similarities in their patterns. The really neat thing about fractals is that they have really elegant recursive definitions!
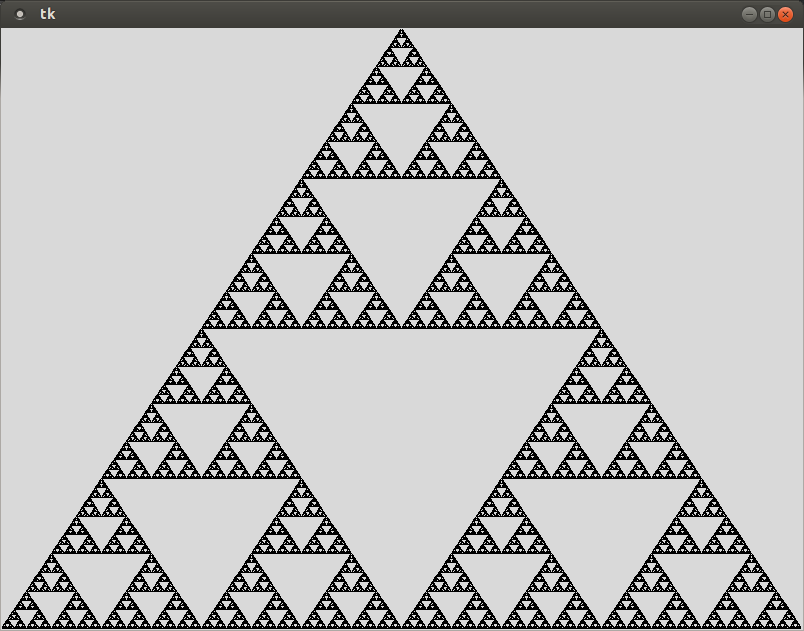
The Sierpinski triangle (or the Sierpinski Gasket) is a fractal that is probably fairly familiar to you, . The real Sierpinski Triangle has an infinite depth. Our version of a Sierpinski Triangle will have a fixed, finite depth.
Details
Construction of a Sierpinski Triangle is very straight forward:
Draw a triangle.
Draw another triangle by connecting the midpoints of the three sides of your original triangle. This will split your triangle into four smaller triangles: one in the center, and three around the outside.
Repeat step 2 for each of the outside triangles.
You might want to draw a few rounds of this on paper, just to see how it works.
Create a file called sierpinski.py in your lab19 directory. This program should draw a sierpinski triangle that fills as much of a tk window as possible. You will want to define a global constant DEPTH, which is how deep your recursive process should continue. Let's define the depth of a sierpinski triangle as the number of directly nested triangles at the deepest point. So a triangle is a sierpinski triangle of depth 0. When you draw the first internal triangle you have a depth of 1, etc. A DEPTH of 8 or 9 gives a nice looking triangle in a reasonable amount of time.
Try changing the colors of your triangles and the location of the starting verticies, to create a more interesting fractal. When you are happy with your fractal, take a screen shot and save the image in your lab19 directory.
Example
Hint
-
The midpoint of a line segment can be calculated using linear interpolation. In order to find a point that is some fraction between two points (x1, y1) and (x2, y2) the following equation can be used:
xi = i × x2 + (1 - i) × x1
yi = i × y2 + (1 - i) × y1
Where i is a floating point value between 0 and 1 that represents the fraction of the distance between points 1 and 2 that (xi, yi) is located. For the midpoint, you want i = 0.5.
-
On the surface, it might not seem like the order you specify the points matters. However, it really does. You should always specify the points for your triangle in the same order, in the same direction. I suggest clock-wise starting with the northern most point.
Challenge
Seeing the triangle generated is one thing. However, seeing all of
the steps of the generation is really interesting, to see how each
recursive step changes. Add a Scale
widget to your program, which controls the maximum depth that the
triangle gets drawn to. You should make sure that the triangle gets
updated with every change of the scale.
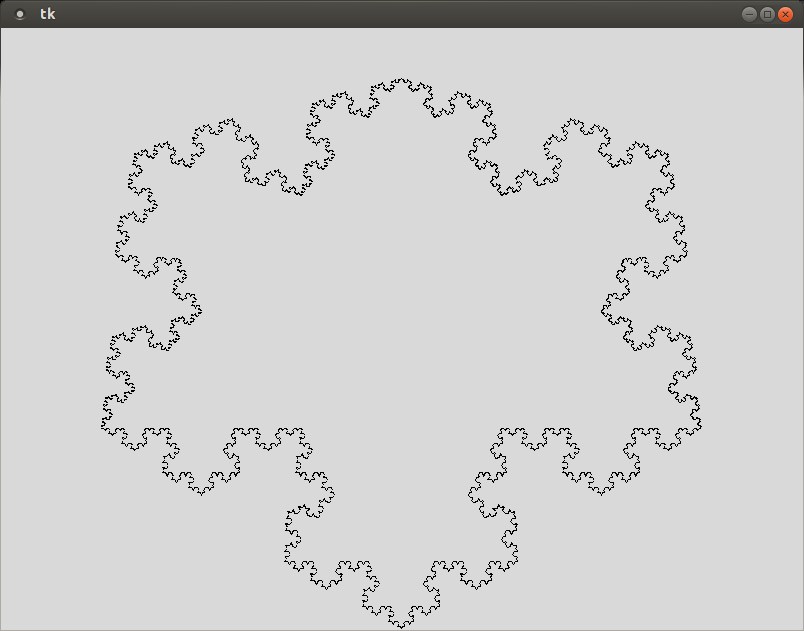
The Koch snowflake (sometimes called the Koch curve or Koch Star) is one of the earliest known fractals. Similar to the Sierpinski Triangle, it starts off with a triangle shape. However, instead of recursing towards the inside of the triangle, the snowflake grows outwards. The concept of the snowflake is easy, but you will need to spend some time thinking about where your should be performing certain tasks.
Details
Once again, the formal definition recurses infinitely. We will want to create a global constant DEPTH, which is going to represent how deep we generate the snowflake.
The snowflake begins by using 3 line segments to form a triangle (This is a Koch snowflake of order 0). The algorithm for generating higher order fractals involves splitting each line segment into three equal segments, then replacing the middle segment by two line segments that protrude outwards. The same algorithm is then recursively applied to each of the 4 new line segments. See the diagram below:

The actual amount that the point (x3, y3) protrudes is up to you, but a value that is about one third of the original segment length produces a nice looking fractal.
Try changing the color of the triangles and the location and number of original line segments. Also play around with the amount of protrusion you are using. When you are happy with your fractal, take a screen shot of it and save it in your lab19 directory.
Example
Hint
-
In order to calculate the four line segments that represent the transformation of the segment defined by the points (x1, y1) and (x5, y5) the points that divide the segment into thirds, (x2, y2) and (x4, y4), must be calculated. These can be calculated using interpolation and the equations from earlier.
-
You can use trigonometry to figure out the (x3, y3) point, but that begins to become very complex as the line segment sizes get very low. Instead, you can compute this protrusion directly using the following equations:
x3 = x1 + x / 2 - y * p
y3 = y1 + y / 2 + x * pwhere
x = x5 - x1
y = y5 - y1and p is a value between -1 and 1 that is the percent length of the original segment that the protrusion will be. That is, if p is 0.5 then the protrusion would be half the size of the segment from (x1, y1) to (x5, y5). If p is -0.5 then it would also be half the size of the segment, but protrude off of the other side of the segment.
-
It may seem counter-intuitive, but the only place you want to perform any drawing is your base case. If you draw in a different location, you are going to end up with line segments you need to erase, which is going to make your code quite ugly.
Challenge
The typical definition of the koch snowflake uses triangles. However, triangles are a little played out. Instead of using triangles, let's use a different polygon, like a square. For each line segment in the original shape, instead of protruding out to a point, create a square with the protrusion. How different does the curve look afterwards?
Play around with different types of polygons. Do any of them create interesting shapes?
Submission
When you have finished, create a tar file of your lab19
directory. To create a tar file, execute the following commands:
cd ~/cs170/labs
tar czvf lab19.tgz lab19/
To submit your activity, go to cseval.roanoke.edu. You should
see an available assignment called Lab Assignment 19.
Make sure you include a header listing the authors of the file.
Last modified: Mon Mar 10 14:33:25 EDT 2014