Lab 1: Introduction to Java
Lab Objectives
- Understand the structure of a simple Java program
- Understand the distinction between compiling and interpreting
Java programs
- Create and execute simple Java programs using Eclipse
- Learn how to find and correct syntax errors in your code.
|
Getting Started
In a typical lab, you will be typing shell commands into an xterm (terminal)
window, using Firefox to access files that have been put on the
Web for you to use in lab, and typing in programs
using Eclipse. Ocassionally, you will also need to use the text editor to
prepare some responses to questions. So, to get started
- Log into Linux and open up an xterm window
and Firefox (use icons
on the panel across the top of your screen).
- Firefox should start with the home page for this course.
Open up the electronic version of this handout by
clicking on the link for the in-class part of lab 1.
- In Firefox we need to change one of the settings so you
can save files to your directory. Click the Edit option on the
menu bar, then choose Preferences. In the Main panel, under the Downloads heading, select the "Always ask me where to save files" option. Click Close.
- Now, in your xterm window use the shell commands you learned last week
to go to the Labs subdirectory of your cs120 directory and create
a lab1 subdirectory. (When you have
done this, the Labs directory will have two subdirectories -- lab0 and lab1).
- Change into the lab1 subdirectory.
Your first CS120 program
Most programs start out as text files that contain a series of
instructions written in a computer language like Java or C++.
The following instructions lead you through the process of
writing and modifying a very simple Java program.
Traditionally the first program a computer scientist
writes in a new language is a simple one that prints out a "Hello, World"
message.
- First you need to open the text editor
using the icon that you created on your toolbar last week.
- Type in the following program exactly as you see it.
package lab1;

/**
 * Prints a "Hello World" message.
 *
 * @author john doe
 */
public class Hello
{
   /**
    * Prints the greeting
    *
    * @param args   command line arguments
    */
   public static void main(String[] args)
   {
      System.out.println ("Hello, World!");
   }
}
- Double check to make sure that your program looks identical to the
one on this sheet.
(The one exception is that you should replace "john doe" with your name)
- Save your program in a file called "Hello.java" in your
lab1 subdirectory (remember, capital 'H').
-
You should note that your program is now color coded.
The colors correspond to some of the major
structural components of this program that we discussed in class.
Specifically you should be able to identify:
- Comment blocks
- The class header and definition
- The main method header and definition
- The instruction to print some text
- The text being printed
- You will probably notice a few differences from the way that
your textbook presents Java source code and what we have written here.
Notably:
- The first line of the program tells us that this code is part of the
package "lab1". This provides some information to the computer that helps to
organize our code. This program is contained within one file, but
eventually we will create software that spans multiple files. Packages are a
way to group these files together.
- Notice that
each line of the comment block begins with '*'. Java does not require this
to form a comment, but it makes it a little easier for people to identify a
comment block. This is a convention that we will adhere to in this class.
- You will also notice that comments in your textbook begin with
"/*" instead of "/**". These are simply two different styles of comments
(recall that // is another style).
We prefer to use "/**" to start comments for this class.
You will learn in a few weeks that this
style ("/**") will allow us to easily generate web pages from your comments.
- You are now ready to compile the program.
Activate your xterm window then move the to the "Labs" directory.
Type the command
javac lab1/Hello.java
If all went well (no error messages) a file named Hello.class
was created by the compiler. This file contains the bytecode
version of the program. If you recieved an error make sure that your present
working directory is "Labs" (use the pwd command).
If you had an error, go back to text editor window,
find and correct the error. Save the program again and repeat the
command to compile (in the xterm window).
*** Shell HINT: To repeat a shell command you have already
used press the up arrow key until the command you want to repeat appears,
then press ENTER to execute the command.
- Use the appropriate command(s) to see a list of the files in
your lab1
directory (there are a couple of different ways you can do this).
You should have at least two files -- Hello.java and
Hello.class.
Hello.java is your source code; Hello.class
is the file containing Java
bytecode created by the compiler.
- Now run (execute) the program by typing (in the xterm window)
the command
java lab1/Hello
This sends the Java bytecode through the Java Interpreter.
You should see the hello message followed by the command line prompt on
the next line.
Setting up Eclipse
You have just written your first Java program using a Text Editor. It got
the job done, but this process can be made much easier using an
Integrated Development Environment or IDE. IDEs facilitate the programming
process by helping programmers adhere to
good programming practices, quickly identify mistakes, and helping to
organize large projects. Many times the IDE even helps to generate generic
code frameworks and allow programmers to simply fill in the details.
For this class we are going to use the Eclipse IDE to help us create our Java
programs. You can start Eclipse by clicking on the icon that you added
to the Gnome panel last week.
Since this is the first time using Eclipse, there are a couple of things we
need to do to get started.
- The first thing that you will see is a dialog asking you to select a
workspace. This is the general location
where Eclipse will store all of your programs. You want to use your
cs120 directory, so you should enter
/home/students/jdoe/cs120
substituting your username for jdoe. For this class we will always use
this directory as our workspace, so you can also check the option to make this
the default directory.
- You will probably see an Eclipse welcome screen. There are several
useful icons on this screen, including a tutorial for how to use Eclipse.
Right now, we are interested in the Workbench - the icon to the far right
side of your screen . Click the icon to enter the workbench (also
called workspace).
- We also would like to set some preferences to make Eclipse function
consistently for everyone in the class. These preferences are stored in the
file that you copied to your home directory last week (RCEclipsePrefs.epf)
To load them into Eclipse:
- Use File menu and select the Import option. A new
"Import" dialog box will appear.
- Open the General option, highlight Preferences and then
press Next
- Browse for the file RCEClipsePrefs.epf (Remember, it was stored in
your home directory) and then click Finish.
Later in the semester, you may wish to set up Eclipse to run on your personal
computer. You will use this same preferences file to ensure that the same
standards and conventions are used as the lab computers.
Projects, Packages & Classes
One of the advantages of Eclipse is that it helps us to organize the
code that we produce. Specifically, Eclipse lets us create projects -
large groups of code that contain packages - smaller groups of code,
usually centered around a particular theme, which in turn hold
classes - actual code for specific instructions or programs.
This kind of stucture may sound familiar; in fact, projects correspond directly
to directories, packages are subdirectories and classes are files.
- In this semester, you will
have two major projects: Labs and Assignments. Remember that you already
created these directories in your account earlier, our next step is to
designate these directories as Eclipse projects. To accomplish this:
- Under the File menu, expand the new option and select
project
- When the New Project Wizard dialog appears, press Next
(if Next isn't an active option first click Java Project).
- Enter "Labs" in the Project Name field. Note:
you should see a message at the bottom of the window indicating that the
"external location exists". This is simply reminding you that you already
have this directory in your account. If you do not see this message, please
contact your instructor or lab assistant.
- Press Finish. You should see Labs added to the left-most panel of
the Eclipse window. This panel is known as your "Workspace".
Repeat this process to create an Assignments project as well.
Your workspace should now contain two projects: Labs and Assignments.
This mirrors the directory structure in your cs120 directory.
-
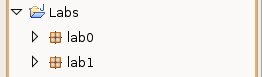
Projects group together packages. Double click on the Labs project to
see its packages; it should already contain two. Your workspace should look
something like this:
If you don't see these packages, you can Refresh the workspace
by pressing the F5 key. (You may also see JRE System Library listed.)
If they still don't appear, call over your instructor
or lab assistant.
Where did these packages come from?
- Each week you will designate a new package to hold your work for the
week's lab activities. Packages group together classes. Double click on the
lab1 package to see its classes.
You should find that lab1 contains the "Hello" Java file that you typed in
previously. Double click on the Java file containing the
Hello class. You should see
the source code load into the center panel of the Eclipse window. There
are some notable points about the code:
- The comment blocks are color coded - they appear in light blue.
- Java keywords appear in purple/maroon.
- The spacing is probably slightly different from the way that you
typed it. You can fix this quickly by asking Eclipse to Format your
code. You can do this by choosing Format from the Source menu
(alternatively, you can press CTRL-SHIFT-F).
Eclipse is aware that you are trying to write
Java Code. Automatically formatting and color coding your work are some of the
ways that Eclipse tries to make life easier for you as a Java programmer.
- Now we are ready to try executing your program. To do this:
- Under the Run menu, expand the Run As option and select
Java Application.
- You may see a Save and Launch dialog asking you to
to save your program before it is run. Since you
almost always want to save your files, it is reasonable to check the
Always save resources... box if you wish. Press Ok to
continue.
- If the bottom of the Eclipse window does not contain a console tab, select Window>Show View>Console from the menu bar. In the Console, you will see the phrase,
"Hello World!".
Creating a Java Program in Eclipse
In the previous activity, you were working with a program that already
existed. Now
we would like to create a new program from scratch
within Eclipse. This program will
be very similar to "Hello"; the only difference is that it will display a
different message.
- With the lab1 package highlighted in the Workspace, open the File
menu, expand the new option and select class.
- In the dialog that appears, verify that the Source Folder is "Labs" and that the Package
is "lab1".
- In the Name field, enter "Cool".
- Notice the capital "C" in Cool. Class names, by convention, should start
with a capital letter.
- Do not hit Enter when you
finish typing the Name - that will Finish the Wizard.
- Under the option Which method stubs..., you will
need to add a check next to "public static void main (String[] args)"
- Click on Finish
In the center panel you should see the following text appear
package lab1;

/**
 *
 * @author jdoe
 */
public class Cool
{
   /**
    * @param args
    */
   public static void main(String[] args)
   {
      // TODO Auto-generated method stub
   }
}
You will see this same structure over and over again in this class. While
Eclipse was kind enough to generate it for us, it can only create
parts of the code that are generic. This program still does not do
anything; notice that there are no commands in the main method. Let's fill in the details for this framework by adding
instructions to accomplish our task.
- In the begining of the first comment block, add some text describing the overall purpose
this program (This program prints a "Cool" Message). You will
notice that when you add text to a comment block in Eclipse, each line is
automatically preceded by an "*".
- Add text to beginning of the comment block preceding the main method; indicating what it will do. In this example, like Hello, your comments will probably be
redundant. Since there is only one method in the class, the class and the
method will do the same thing - print a cool message.
However, it won't be long before your class
contains multiple methods. It is a good habit (and makes professors happy)
to provide details of every class and method definition via comments.
- In the main method, replace the "TODO" comment with the
following line of code:
System.out.println("Java is Cool!");
- The original role of the comment was to tell the programmer to make a
change. Once you add the code, the value of the comment is moot.
Comments can be very useful to leave notes to yourself while you are coding,
but it is very bad form to leave expired comments in your program. You
should always replace or remove comments that are no longer relevant.
- Execute (run) this program, and verify that your code functions as intended.
Syntax Errors
You may have experienced what happens if your code is incorrect. Mistyping
a command, forgetting a ';' or capitalization mismatches are all examples of
Compile-time Errors. If you are using the javac command in
an xterm, the compiler will generate a collection of error messages and does
not create the bytecode file. In Eclipse, source code is automatically
compiled so these kind of errors can be detected immediately. Syntax errors
are flagged with a red 'x' in the margins of the code. Moving the mouse over
the 'x' give a more elaborate description of cause of the problem. These
descriptions can be quite useful once you learn to interpret them.
In the following you will be introduced to a few typical errors into the
Cool program and examine the error messages.
- Class name is not the same as the file name
In Java, when you define a new class, it must be saved in a file that
shares the name of the class. Delete the l (el) from
the name of the class (so the first non-comment line
is public class Coo).
What was the error message (put your mouse over the red x)?
- Correct the mistake above, then delete the l (el) from the
Cool in the comment block (inside the quotation marks).
Does this generate an error message?
why not? Run the program to see what happens.
- Leaving off a quotation mark in a string literal
Correct the mistake above, then delete the
ending quotation mark enclosing the string Java is Cool!
- What is the error message?
- Notice what happened to the text at the end of the line. Why did it change color?
- Put the ending quotation mark back, then take out the beginning one.
Examine the error message -- notice that it indicates there are "multiple
markers". The compiler is trying to make sense of what you have typed, but
it is rather confused. After we study variables, you will have a better
understanding of what the compiler thinks. If
you scan the list of errors, you will notice a message about
double quotes. When you get lots of errors,
it is often useful to
concentrate on the ones that appear first and work your way down the list.
Fix the last error (put the quotation mark back).
- Lastly, try deleting the "n" from the end of println. Make a note of
the error message. The compiler is effectively telling you that it does not
understand the command that has been issue; printl is not a recognized command.
- Correct the last error before proceeding (otherwise you will get an
"errors exist in project" message when you try to run the next programs
you add to the package).
Modifying programs
At any time you can go back to previously written code to make changes.
To start this section, re-activate the "Hello" program. You can accomplish
this either by selecting
the appropriate tab from the center panel or by selecting
the Hello class from the Workspace browser.
- Add appropriate statements
to the Hello program so it will print the following:
    *******************
       Hello, World!
    *******************
Run your new version (make sure it prints
the correct pattern).
- println versus print. Section 2.1 of the text (beginning on
page 34) discusses the difference between println and
print. See this difference by changing all println's to print
in the program. Run the revised program.
- Printing a blank line. A blank line is printed by invoking
the println method with no arguments -- that is, with the statement
System.out.println();
Change each print back to println then insert statements to print 4 blank
lines: one before the first row of stars, one between the first row of
stars and the message, one between the message and the second row of
stars, and finally one after the last row of stars. Run
your program. Does the last blank line make any difference
in the way the output looks?
- Making a new program from the old. Often when programming
you want to take a program you already have as a basis for a revised
one or you want to try changes to the program without losing the
old one. To do that you need to make a copy of the original
program to work with so you have both the old and new. Your job now
is to make a new program by customizing the Hello program.
-
With the Hello.java active in the center panel, Use the File -> Save As option
to save a new copy of the original Hello.java. Name this new file
MyHello.java.
- You should notice that MyHello.java will be automatically added to your
lab1 project in the Workspace navigator. You should also notice that this
file
contains syntax errors. But how can that be? Hello.java didn't have any
syntax errors! The source code for MyHello.java should be open
in the center editing window (if not open it). Find out what the error
is and fix it.
- Make the appropriate changes so
that the program prints the following (put your name instead
of Bozo -- make the border align nicely):
    *****************************

       Bozo says Hello, World!

    *****************************
- Escape sequences The "Hello, World!" part of the message
above should really be enclosed in quotation marks but we can't just
put quotation marks inside the println statement because the Java compiler
would interpret them to mean the end (or beginning) of a string.
To print special characters such as these in Java you use an escape
sequence (discussed on pages 39 - 40). The backslash character
indicates the beginning of an escape sequence. The table on page 40
shows the meaning of the different Java escape sequences. Add the
\" escape sequence to your program so the message Hello, World! is
enclosed in quotes when printed out.
- After your program is correct print out a copy of it (you will
turn this in at the end of lab) using the following command:
enscript -2rG MyHello.java
Names and Places Program
Our next goal is to develop
a program that will print out a list of student names together with
other information for each. The tab character (see escape sequences) is
helpful in getting the list to line up nicely. A program with only
two names is in the file Names.java.
-
Do the following to copy this program to your lab1 directory:
- In Firefox, you should have open the online version of
this handout.
- Go down to the link to the Names.java
file and click on it.
- You should
see a window that gives you a choice of opening the file
or saving it to disk. Choose the save option and click OK.
- The next window will have the name of the file to save at the top. Leave it as Names.java. In order to save it to your lab1 directory choose your user name from the list of places on the left side of the window and browse to your lab1 directory on the right side of the window by double clicking on directories.
- Click the Save button when you have lab1 as the directory (you should see the files Cool.java, Hello.java, and MyHello.java listed).
-
Open the file in Eclipse (you will probably need to refresh your
workspace using F5) and study it for a few minutes particularly
noting the use of the escape sequences for the tab character.
-
Run the Names program to see what it prints.
- Now add code to the program so that your name and hometown and the name
and hometown of
at least two classmates sitting near you in lab also are printed.
(So, the program should print at least 5 names.) Also add your name
in the documentation at the top of the program.
Run the program. Make sure the columns line up.
- Modify the program to add a third column with the intended major
of each person (assume Sally's major is Computer Science and Alexander's
major is Math). Be sure to add a label at the top of the third column
and be sure everything is lined up (use tab characters!).
- Print a copy of your final Names program. (Remember the up arrow -
use it to retrieve the last time you printed and just change the
file name in that command.)
Two Meanings of +
When using a string literal (a sequence of
characters enclosed in double quotation marks) in Java the complete
string must fit on one line. The following is NOT legal (it would
result in a compile-time error).
    System.out.println ("It is NOT okay to go to the next line
                           in a LONG string!!!");
The solution is to break the long string up into two shorter strings
that are joined using the concatenation operator (which is the +
symbol). This is discussed in Section 2.1 (pages 36 - 39) in the book.
So the following would be legal
    System.out.println ("It is OKAY to break a long string into " +
                           "parts and join them with a + symbol.");
So, when working with strings the + symbol means to concatenate the
strings (join them). BUT, when working with numbers the + means what it
has always meant -- add! To see the behavior of + in different settings
do the following:
- The file PlusTest.java contains the
following program:
package lab1;

/**
 * Purpose: Demonstrate the different behaviors of the + operator
 *
 * @author ingram
 */
public class PlusTest
{
   /**
    * prints some expressions using the + operator
    *
    * @param args   command line arguments
    */
   public static void main(String[] args)
   {
      System.out.println("This is a long string that is the "
         + "concatenation of two shorter strings.");

      System.out.println (7 + 8);

      System.out.println ("7" + "8");

      System.out.println ("7" + 8);

      System.out.println("8 plus 5 is " + 8 + 5);

      System.out.println("8 plus 5 is " + (8 + 5));

      System.out.println(8 + 5 + " equals 8 plus 5.");

      System.out.println("The first computer was invented about"
         + 60 + "years ago.");

   }

}
- Study the above program a minute, then in Firefox open it
(click on the link above) and save it
to your lab1 directory.
- In Eclipse refresh your workspace (f5) and double click the PlustTest.java file in
left panel. Run the program, study the, output and observe the following:
- The first print statement probably did what you expect - it
concatenated the two strings and printed
the whole string on one line.
- For the next three statements the following rules for evaluation are used:
- If both operands are numbers the + operation
is treated as ordinary addition. (NOTE:
in the expression a + b the a and b are called the operands.)
- If at least one operand is a string the other operand is converted to
a string and + is the concatenation operator.
So, the output for the second print statement was just the number 15 -
the two operands for the + operator are numbers so they were added and
the result printed.
In the third line the two operands for the + are strings (be sure
you understand why)
so the two strings are concatenated and the result 78 is printed.
Finally in the fourth line "7" is a string and 8 is a number so the
8 is converted to a string and the two strings are concatentated resulting
in the string "78".
- For the next three statements the expression to be printed contains
two + operators. When there is more than one operation to be performed
the following additional rules are used:
- If an expression contains more than one operation expressions inside
parentheses are evaluated first.
- If there are multiple + operations with no parentheses to specify grouping
the expression is evaluated left to right.
For each of the three output statements (the ones dealing with 8 plus 5)
add comments to the program to indicate
what will be printed and an explanation of why.
In particular, specify which + is evaluated first and why.
Give the result of just
that evaluation (not the whole answer) and indicate whether the result a string
or a number. Your explanation should be based on the
rules Java uses for evaluating expressions.
- Notice that the statement about when the computer was invented is
too scrunched up. Modify the code to fix this problem. Your modification
should be to the existing strings - the basic format should still be
a string concatenated with the number 60 which is then concatenated
with another string.
- Print a copy of the completed PlusTest.java.
Your last task for today!!
Write a complete Java program that
prints out the following sentence.
Ten apples plus 13 bananas is 23 pieces of fruit.
Your program must use only one
statement that invokes the println method. It must use the +
operator both to do arithmetic (add 10 and 13) and string concatenation.
Make sure that your program includes comments that document the heading
information (Author and Purpose) and the key steps of the program.
Print out a copy of your completed (and working!) program.
TURN IN the following:
- Printed copies of MyHello.java, Names.java, PlusTest.java
and your last program;
this handout with your answers to earlier questions written in.
Be sure your name is on all copies.
- Email your source code for each program (MyHello.java,
Names.java, PlusTest.java and your last program) to your instructor for
-- Dr. Ingram (block 3/Thursday lab)
ingram@roanoke.edu or Dr. Bouchard (block 4/Tuesday lab)
bouchard@roanoke.edu.
Send ONE mail message with all four files attached (go through the same
steps as in lab 0 for each file - you can see the list of your attachments
at the bottom of the composition window). The subject
must be cs120 lab1 (note -- no spaces in cs120 and no
spaces in lab1).